Blog Archive

Wednesday 29 August 2012

Half Moon Nails


The French Manicure has been reversed. Inspired by Dita Von Teese, everyone's now wearing Half Moon Nails; so SAVI's here to show you how!
Dita Von Teese

Lady Gaga 

Rihanna


How To


With Love,

SAVI
#TVOK


If you like what you see, follow us on twitter @SaviHQ


Jazz Hands


Christmas has come early, as Autumn 2012 is all about the sparkly nails. With every beauty company bringing out their new version of glitter nail polish, SAVI wants to show you there's no need to spend a fortune on the latest sparkles when you can DIY...

Katy Perry


What you need

  • Fine loose glitter
  • Base coat
  • Base colour
  • Top coat

SAVI loves 
Loose Body Glitter by Barry M


How To


Totally Sparkly:

  1. Pour a small mound of glitter onto paper and spread to create a thin 2cm x 2cm layer
  2. Paint base coat on nail
  3. Immediately roll nail in pile of glitter
  4. Using an eyeshadow brush, dab more glitter onto areas of nail where glitter is too thin
  5. Leave to dry, then paint over with clear top coat
Dispersed Glitter:

  1. Paint desired colour on nail
  2. Before it dries, take a pinch of glitter and sprinkly on slowly, adding more until you're happy with the sparkles
  3. Leave to dry, then paint over with clear top coat
TIP: If doing directly onto real nails, do one nail at a time, waiting until it is completely dry before you move onto the next one. This will prevent smudging and loss of glitter.


Now you just have to find the perfect shoes to match!


With Love,

SAVI
#TVOK


Wednesday 22 August 2012

New Fashion is Old Fashion


Inspired by a trip down Brick Lane, Savi wants the world to go vintage...


The red carpet has been glittering with diamonds and pearls, and everyone - from Kate Moss to Katy Perry - is doing it...and we love it!


Kate Moss

Sienna Miller

Mary-Kate & Ashley

Nicole Richie

Reese Witherspoon

Drew Barrymore

Emma Watson

Agyness Deyn

Mischa Barton

Katy Perry


Hair & Makeup

Christina Aguilera's vintage style


SHOP VINTAGE

Here are some of Savi's favourite vintage hangouts in London

Rokit
42 Shelton St
City of London
London
020 7836 6547


Beyond Retro
58-59 Great Marlborough St
London
020 7434 1406
www.beyondretro.com


The Vintage Showroom
14 Earlham Street  
Seven Dials
Covent Garden 
WC2H 9LN020 7836 3964


Vintage Store
182 Brick Lane
London
E1 6SA


Absolute Vintage
15 Hanbury St
Spitalfields
London
E1 6QR


Be prepared to spend hours rummaging to find some beauties.

For those of you who cant get to London, check out the websites.

Tweet us some pictures of your favourite or future vintage buys @SaviHQ


With Love,

SAVI

#TVOK


Saturday 18 August 2012

In to Space

FROM A GALAXY FAR FAR AWAY...

Inspiration from the recent landing on Mars, SAVI tried out some space themed nails...


Requires quite a few different nail polishes

1. Paint the entire nail with a black polish. SAVI used Maybelline New York

2. With a make-up sponge dab a little of the white across the nail allow to dry. SAVI used No 7 Nail Tip Whitener


3. On top of the white dab a little of the yellow. SAVI used Topshop's Bee's knees 202

4. Then Dab a smaller amount of pink onto the yellow. SAVI used No 7 Frosted pink 35

5. Around the edges of the white sponge on a small amount of dark blue to fade into the black. SAVI used Barry M Navy 913

6. Around the edge of this galaxy randomly place a few white stars. SAVI used Topshop's White Frozen Nail Art Pen

7. Allow to Dry and then paint over a clear glitter coat. SAVI used No 17 glitter topcoat.

8. Onto this paint a topcoat. SAVI used Rimmel London's PRO super wear ultra shine topcoat


Whilst the colours have been distorted by the camera flash,
 this image shows the range of colours better than the other image

Here at SAVI HQ we'd love to hear your suggestions, so give us a tweet @SaviHQ or an email to savihq@gmail.com

With Love,

SAVI

#TVOK


Friday 17 August 2012

Nail Effects

Konad Stamping Nail Art

Allows you to have almost any deisgn on your nails


http://www.amazon.co.uk/Konad-Stamping-Nail-Art-Boxed/dp/B000Q4QFX6/ref=sr_1_7?ie=UTF8&qid=1344890333&sr=8-7

SAVI'S first attempts using KONAD

SAVI used Barry M's Berry I/C 226 and then used the black KONAD special polish to try out different designs. This could be used effectively as an 'odd one out' nail as featured in a previous post on our blog or you could have something on all nails.

Magnetic Nail Varnish

SAVI uses Barry M's Magnetic Dark Silver 209 and Magnetic Burgundy 218

The red polish produces faint stripes and the black polish produces a zigzag pattern.

The Chameleon Effect

SAVI used Barry M's chameleon lilac 225. The chameleon effect works by painting the coloured nail varnish waiting until it is touch dry and then using your top coat to create patterns. the lilac turns to a darker shade of purple. SAVI used Rimmel London's PRO super wear ultra shine topcoat.


The Cracking Effect

Again SAVI used Barry M's Black cracking nail polish. Recently SAVI has also purchased Barry M's croc nail effect in black. This nail varnish cracks in a different way.


Nail Art Pens

SAVI used model's own black nail art pen on top of No 7 Nail tip Whitener 05. SAVI's tip would be to paint the checks and then fill them in. This would be another good 'odd one out' nail. 


SAVI also has two topshop nail art pen's Barbarella pink and frozen white. When using these ensure the polish is hardened not just touch dry for best results.

Gems Gems Gems...


Orange Nail Art pen's sequins and No 7 Tangy 220. The Gems are lining the edge of the nail of the ring finger hard to see in a picture and the polish should be wet when the gems are applied. This image features in the 'odd one out' nail post


A little bit of glitter


GOSH's 10 blue saphire. needs to be applied to wet nails and then SAVI advises using a topcoat to ensure the glitter stays in place for longer. This image is again in he 'odd one out' post.


Here at SAVI HQ we'd love to hear your suggestions, so give us a tweet @SaviHQ or an email to savihq@gmail.com

With Love,

SAVI

#TVOK

Thursday 9 August 2012

PLAITS and BRAIDS


SAVI's HOW TO guide on plaits and braids

To avoid confusion throughout the instructions when SAVI refers to the middle strand it is the current middle strand not necessarily the middle strand you started with, this is the same for the the left and right strands.

THE CLASSIC - FRENCH PLAIT

1. Take three strands at the top of your head start by putting left strand over middle then the right strand over the middle.

2. Add a piece of hair to the left strand put the larger strand over the middle and do the same for the right.

3. Keep adding to the two sides when you reach the bottom of your head you should have included all of your hair.

4. Continue to plait normally

Here you can see British singer Leona Lewis with a side French plait. This is done in exactly the same way just started in a different place.


THE NOT SO CLASSIC - DUTCH BRAID

This braid is very similar to a french plait, but the difference is the braid stands out from the head.
Often done over the top of the head, for this style, see below, start above your ear and then follow instructions

1. Start with three strands at the top of your head, just like the French plait, take the middle and put it over the left strand, now take the middle strand and put it over the right strand.

2. Add a piece of hair to the left strand before placing the middle over it again, do the same to the right.

3. Continue adding hair to both sides, when you reach the bottom of your head all hair should be included in the braid.

4. Continue to plait

Cheryl Cole is trying out a dutch braid that is working it's way around into a bun at the back of her head.


THE FISHTAIL - It takes some time...

A normal fishtail braid would start at the nape of your neck

1. Split the hair in two, take a piece from the right side and put it in the left side, then take a piece from the left Side and put it in the right side.

2. Continue to do this and the fishtail braid will start to take shape.

3. For a more delicate braid use smaller pieces, this will take longer to do however

4. At SAVI we like to start the braid a little higher, this works very well if you have long thick hair. Instead of taking pieces from the other strand take pieces of hair not incorporated into the plait. Once all hair is in start your fishtail as normal.


Fishtail from behind


Fishtail from the side

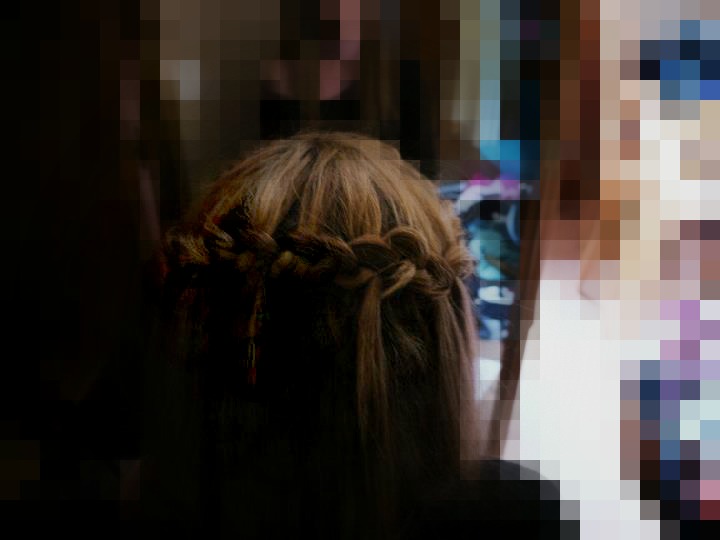
THE WATERFALL BRAID - Simple once you know how...

This plait works it's way round the side of your head, and takes some practise to get right.

You need to decide whether you want a Tight or loose braid before you start, tight braids look better with more waterfall strands and loos ones look better with less.

1. Take three strands at the side of your head, place the upper strand over the middle strand and then the lower strand over the middle strand. Continue to do this.

2. When you want the first waterfall strand place the upper over the middle and then the lower strand over the middle, the strand that is now the lower strand you need to drop and bring in a new upper strand. Continue to plait normally until you want the next waterfall strand.

3. Try and keep the same amount of distance in between the waterfall strands.

4. Ending the waterfall braid is tricky. Once you reach the other side of your head some people like to continue plaiting normally then winding this plait round to have a flat bun on the side of your head. SAVI's not a great fan of this. For our look below we reached the other side of the head and used bobby pins to secure the plait then let the hair fall normally.


Waterfall braid


One of SAVI's most loved creations is a combined dutch and waterfall braid. Unfortunately pictures do not do it justice!!

It starts with a dutch braid going over the head then when reaching the other side develops into a waterfall braid. This works best on someone with long thick, preferably straight hair.

THE CLASSIC TWIST

This is a fun favourite at SAVI...

1. Take two pieces of hair and twist them round your fingers clockwise

2. Twist them once round each other anticlockwise. After you've twisted them round each other you have to twist them individually again.

3. Add a small piece of hair to each strand, twist individually to incorporate the extra strands and twist over each other again.

4. You can either finish it half way up the head like we've done or carry on twisting the hair into a long twist.

5. This twist look works well when you start one from each side of the head, work them downwards into a bun at the nape of your neck.

The Twist Braid Side view


The Twist Braid Back view


Here at SAVI HQ we'd love to hear your suggestions, so give us a tweet @SaviHQ or an email to savihq@gmail.com

With Love,

SAVI


#TVOK

Not all pictures are Savi's